Machine learning today allows you to achieve very interesting effects. Probably everyone has heard about Deepfake. In today’s post I wanted to show you how much this technology is available for everybody this days.
Using my repository you will be able to create face image animations using the image of your face recorded in real time on the camera:
…or to create face image animations using the previously created video of your face:
In this post I will show the code from my repository real-time-example-of-first-order-motion-model-for-image-animation but I would not created that without other people’s work. Projects I used:
AliaksandrSiarohin/first-order-model
anandpawara/Real_Time_Image_Animation
Machine learning model used in the program was described in paper:
@InProceedings{Siarohin_2019_NeurIPS,
  author={Siarohin, Aliaksandr and Lathuilière, Stéphane and Tulyakov, Sergey and Ricci, Elisa and Sebe, Nicu},
  title={First Order Motion Model for Image Animation},
  booktitle = {Conference on Neural Information Processing Systems (NeurIPS)},
  month = {December},
  year = {2019}
}
Short explanation on how the model works
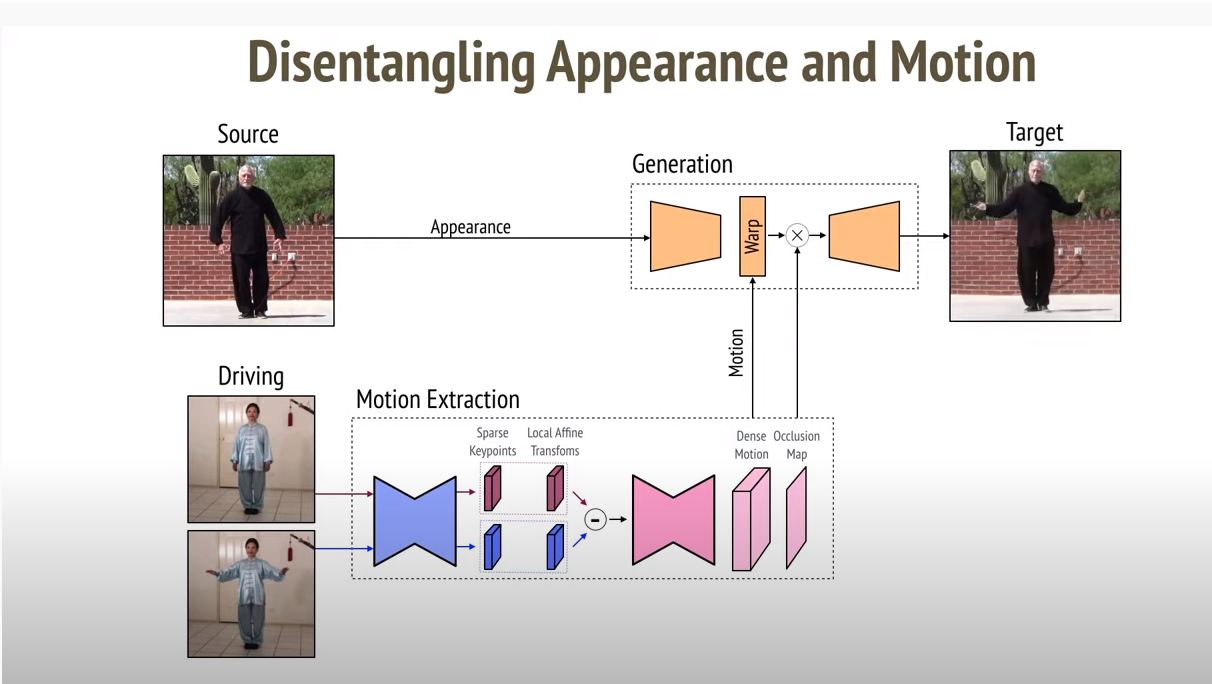
In short, the model decouples appearance and motion information. To support complex motions, it uses a representation consisting of a set of learned keypoints along with their local affine transformations. At the end it combines the appearance extracted from the source image with the motion derived from the video.
I encourage you to watch the video of one of the authors of the model.
How to run project
In order to run the project you need to have Docker installed on your machine. I have been tested this project using Docker 19.03.10 version with nvidia-container-toolkit 1.1.2-1 (if you don’t have CUDA compatible graphics card you don’t need nvidia-container-toolkit).
It’s best if you have CUDA compatible graphics card and Docker with CUDA capabilities but don’t worry if you haven’t ![]() , you can still run the project and use image animation but not in realtime. Making predictions without CUDA is just too slow.
, you can still run the project and use image animation but not in realtime. Making predictions without CUDA is just too slow.
To build image please run:
./build.sh
…and then you can run container using (CUDA):
./run.sh
…or using (CPU):
./run_no_cuda.sh
You should see link to jupyter notebook in terminal, something like this:
http://127.0.0.1:8888/?token=edb9623d6c4ff0eac3096f88bb53ed1f3cfefdd9468f06ab
After you open the Jupyter please run demo.ipynb notebook. I will explain few things here but you can also follow instructions and notes included in jupyter notebook.
Explanation of notebook sections
Load imports and setup
It’s one important thing here aprat from imports. Please set USE_CPU to False if you don’t have CUDA compatible graphic card.
Choose source image
In this section you have to choose the image to be animated. You can choose anyone available in the source_image_inputs folder or upload your own image and put it in this folder. Remember that it’s best if the image has the following specifications:
- square proportions
- the background has an even color
- the face is clearly visible In this section we also resizing image to 256x256 and cutting color to three channels.
Create a model and load checkpoints
We use a trained model here so we have to download it. I have created a function that will automatically download the model and extract it to the extract folder if it does not already exist.
Record your source video
Now is the time to record the video that will be used to animate the previously selected photo. You can skip that and use video that I provieded in repository (temp/test_video_cropped.avi), if you wan’t that please jump to Resizing source video and image section. You can also skip creating animation from prepared video and go straight to the Real time image animation section from here and try real time animation!
Crop and scale video
Recorded video need to be croped and scaled so only your face will be visible in it. The library [1adrianb/face-alignment] (https://github.com/1adrianb/face-alignment){:target=”_blank”} is used to search for the right area to crop in video:
class CropVideoArgs:
    def __init__(self, video_input):
        self.inp = video_input
        self.image_shape = (256,256)
        self.increase = 0.1
        self.iou_with_initial = 0.25
        self.min_frames = 150
        self.cpu = USE_CPU
args = CropVideoArgs(VIDEO_RECORDING)

commands = process_video(args)
After you run above cell, program will search for any faces in provided video and the corresponding parameters for the ffmpeg program, will be returned. You could provide long file with many different faces and program will find all of them and it returning also time (start,end) when face is appearing in recording. For simplicity I use only the first founded face and I use these parameters in the next cell to call ffmpeg.
This process can be slow when you not using CUDA…
Resizing source video
This section automatically selects a recording. If no new recording is available(VIDEO_RECORDING_CROPED), a test recording is used (VIDEO_RECORDING_CROPED_TEST). Test recording is just video with my ugly face ![]() .
Video recording is also resized to 256x256 and only three color channels are used.
.
Video recording is also resized to 256x256 and only three color channels are used.
Perform image animation
In this section, we will do animation using the model. There are important parameter relative which can produce different results:
- when
Trueit is using relative keypoint displacement - when
Falseit is using absolute coordinates. Using absolute coordinates, there are no special requirements for the source video and the appearance of the source image. However, as mentioned by author of the model this usually leads to poor performance, because irrelevant details such as shape are transferred. So using relative coordinates it’s usually better but requires that the object in the first frame of the video and in the source image have the same pose.
I leave two combinations from original project and you can do any of them and choose the best. All resulting recordings are saved in temp folder.
Save animation result with source video and possibly convert to GIF
You can create video file with source image and animation and also convert it to GIF. It will look lie this:
Real time image animation
Here is the coolest part. You can do animation in real time. The camera image is croped and scaled in real time using OpenCV. The result is visible in frame and also recorded to a file.
Summary
You can find all the source code in my repository GitHub account
And don’t forget to give some ![]() to authors of other projects mentioned in the beggining !
Have fun and thanks for reading!
to authors of other projects mentioned in the beggining !
Have fun and thanks for reading!