
My daughter attends the classes on which she recently wrote Python scripts that can interfere with Minecraft world. Everything can be implemented with thanks to great mod created by arpruss - Raspberry Jam Mod. Creator of the mod wrote great instruction on Instructables that show you how to install and use the mod in Minecraft. I wanted to play with mod and I thought it would be fun to draw in a Minecraft what can now be caught in the lens of a computer camera and mainly meant my own face :).
I used the OpenCV library to capture images from the camera. In order to install OpenCV you must first install NumPy library. You can download all libraries using pip repository (except the Raspberry Jam mod that can be installed using instructions from Instructables). Additionally on Windows system you can download wheel files from below site:
and install them using pip, in example:
pip install opencv_python‑3.4.1+contrib‑cp36‑cp36m‑win32.whl
If you have Minecraft, Raspberry Jam Mod and both of the above libraries you can start writing some code.
First let’s have look at imports:
import cv2
from mcpi.minecraft import Minecraft
from math import sqrt
As you can see I just imported OpenCV, Minecraft class from mod library and sqrt function from math standard library.
The main part of the code is two global variables and a while loop:
mc = Minecraft.create()
cap = cv2.VideoCapture(0)

...some code omitted

while(1):

    # reads frames from a camera
    ret, frame = cap.read()

    # if camera is upside down change value (0 or 1)
    frame_flip = cv2.flip(frame, 0)

    # converting to camera img from bgr to rgb
    frame_rgb = cv2.cvtColor(frame_flip, cv2.COLOR_BGR2RGB)

    # you can experimant with blurr
    #blurred = cv2.GaussianBlur(frame_rgb, (3, 3), 0)

    # resize img
    frame_rgb_resized = cv2.resize(frame_rgb, (80, 60))

    # display an original frame and resized frame
    cv2.imshow('Normal picture',frame_rgb)
    cv2.imshow('Resized picture',frame_rgb_resized)

    # Esc key to stop / space to draw picture in Minecraft
    k = cv2.waitKey(5) & 0xFF
    if k == 27:
        break
    if k == 32:
        drawImg(frame_rgb_resized)

# close window and deallocate camera
cap.release()
cv2.destroyAllWindows()
The program reads frames from the camera, reduces their size and changes color to RGB. Most of the cameras in laptops are recorded in BGR color and in order to use the script, it should be converted to RGB (in case of problems, one should look at the camera documentation or make sure it records in BGR). The size of the image can be edited (change cv2.resize(frame_rgb, (width,height)) where width and height are your values), however, you must remember that the bigger the longer it will draw in the game. Sometimes the image from the camera is upside down as it was in my case and it can be flipped using cv2.flip(frame,0).
After launching, the program displays two windows, one with a standard image of the camera, the other with a resized image and It expect to press a space key that initiates drawing a selected frame from the camera image. In order to exit the program, you can press escape.
To draw an image in Minecraft I use several additional methods:
... some code omitted

possibleBlocks = (
    ("Air", 0, ( (0, 136, 255) ,),0),
    ("Smooth Stone", 1, ( (125,125, 125) ,),0),
    ("Dirt", 3, ( (133,96,66),),0),
    ("Cobblestone", 4, ( (117,117,117),),0),
    ("Wooden Plank", 5, ( (156,127,78),),0),
    ("Bedrock", 7, ( (83,83,83),),0),
    ("Sand", 12, ( (217,210,158),),0),
    ("Gravel", 13, ( (136, 126, 125),),0),
    ("Gold Ore", 14, ( (143,139,124),),0),
    ("Iron Ore", 15, ( (135,130,126),),0),
    ("Coal Ore", 16, ( (115,115,115),),0),
    ("Wood", 17, ( (154,125,77),),0),
    ("Sponge", 19, ( (182,182,57),),0),
    ("White Wool", 35, ( (221,221,221),),0),
    ("Orange Wool", 35, ( (233,126,55),),1),
    ("Magenta Wool", 35, ( (179,75,200),),2),
    ("Light Blue Wool", 35, ( (103,137,211),),3),
    ("Yellow Wool", 35, ( (192,179,28),),4),
    ("Light Green Wool", 35, ( (59,187,47),),5),
    ("Pink Wool", 35, ( (217,132,153),),6),
    ("Dark Gray Wool", 35, ( (66,67,67),),7),
    ("Gray Wool", 35, ( (157,164,165),),8),
    ("Cyan Wool", 35, ( (39,116,148),),9),
    ("Purple Wool", 35, ( (128,53,195),),10),
    ("Blue Wool", 35, ( (39,51,153),),11),
    ("Brown Wool", 35, ( (85,51,27),),12),
    ("Dark Green Wool", 35, ( (55,76,24),),13),
    ("Red Wool", 35, ( (162,44,42),),14),
    ("Black Wool", 35, ( (26,23,23),),15),
    ("Gold", 41, ( (249,236,77),),0),
    ("Iron", 42, ( (230,230,230),),0),
    ("TwoHalves", 43, ( (159,159,159),),0),
    ("Brick", 45, ( (155,110,97),),0),
    ("Mossy Cobblestone", 48, ( (90,108,90),),0),
    ("Obsidian", 49, ( (20,18,29),),0),
    ("Diamond Ore", 56, ( (129,140,143),),0),
    ("Diamond Block", 57, ( (99,219,213),),0),
    ("Workbench", 58, ( (107,71,42),),0),
    ("Redstone Ore", 73, ( (132,107,107),),0),
    ("Snow Block", 80, ( (239,251,251),),0),
    ("Clay", 82, ( (158,164,176),),0),
    ("Jukebox", 84, ( (107,73,55),),0),
    ("Pumpkin", 86, ( (192,118,21),),0),
    ("Netherrack", 87, ( (110,53,51),),0),
    ("Soul Sand", 88, ( (84,64,51),),0),
    ("Glowstone", 89, ( (137,112,64),),0)
)

def getBlockFromColor(RGB):
	smallestDistIndex = -1
	smallestDist = 300000
	curIndex = 0
	for block in possibleBlocks:
		for blockRGB in block[2]:
			curDist = getColorDist(RGB, blockRGB)

			if (curDist < smallestDist):
				smallestDist = curDist
				smallestDistIndex = curIndex

		curIndex = curIndex + 1

	if (smallestDistIndex == -1):
		return -1

	return possibleBlocks[smallestDistIndex]

def getColorDist(colorRGB, blockRGB):
	return sqrt( pow(colorRGB[0]-blockRGB[0],2) + pow(colorRGB[1]-blockRGB[1],2) + pow(colorRGB[2]-blockRGB[2],2))

def drawImg(img):
    pos = mc.player.getPos()
    height, width, depth = img.shape
    print("Height:" + str(height))
    print("Width:" + str(width))
    for r in range(height):
        for c in range(width):
            pixel= img[r, c]
            mc_block = getBlockFromColor(pixel)
            mc.setBlock(pos.x+r, pos.y, pos.z+c, mc_block[1])

... some code omitted
drawImg(img) method is the one used when user push space key. It take position of the player and size of the picture passed from camera and then itarate over image pixels, chooses block for given pixel color and draw this in Minecraft game (which you must have running :) ).
There are getColorDist(colorRGB, blockRGB) and getBlockFromColor(pixel) methods whose main purpose is to choose Minecraft block for the given RGB color of the pixel. I borrow this two methods from TeachCraft Examples GitHub (They using PIL library to draw image files in Minecraft).
Here is the effect of using the code:
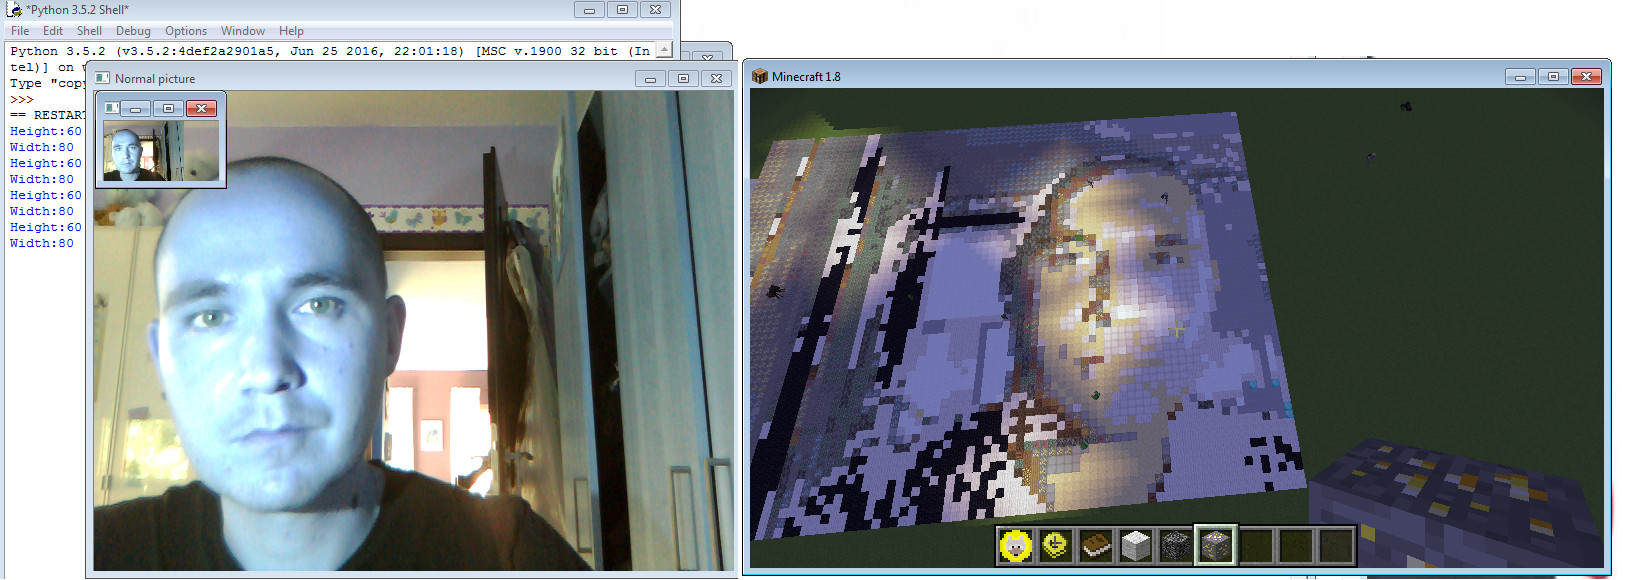
This is it! You can find all the source code in my repository GitHub account.
Have fun and thanks for reading!